
When I first tried hiking with poles I hated it. I’d read about how to use trekking poles properly and forced myself into the strict pattern of only ever placing the poles asymmetrically (see below) on every single step I took. And whilst this is the preferred and best technique for hikers to adopt, I took it a step too far and failed to use my trekking poles in any other way. So as you can imagine, using my poles became more detrimental to my hiking than useful.
But I knew that there are a shed load of benefits to hiking with poles. Benefits that would increase my chances of hiking well into old age and help me go further for longer in the short term. So I gave them another shot, but this time with a more flexible approach, and I’m converted!
Using hiking poles
When I revisited using trekking poles I decided to get a bit experimental and not stick to any kind of prescribed way of using them. And interestingly, I have now found that most of the time I am back to placing them asymmetrically as before, but also using them in different ways.
So what’s my point?
There’s little point in using trekking poles incorrectly. You want to be getting the best out of them – otherwise leave them at home. But it’s also important that you adapt to the terrain, and the pace you want to be travelling at. You don’t need to constantly stick to any prescribed method of hiking with poles, but use them in a way that works best for you, and your situation.
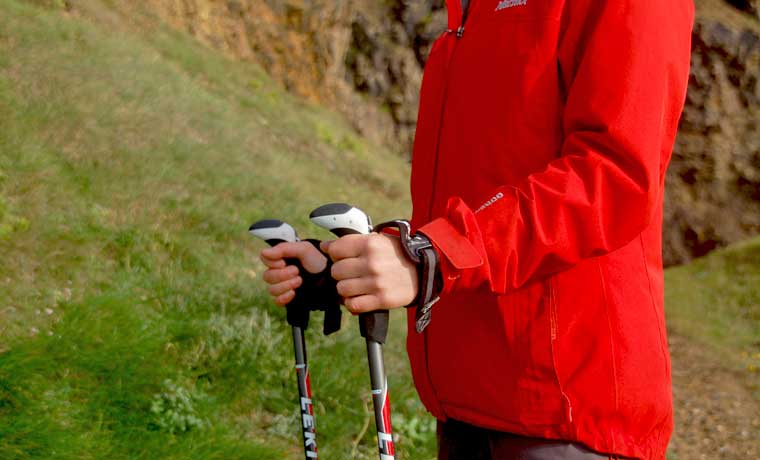
How to set up your trekking poles
Before I go into the different ways you can use your trekking poles, it’s important that you set them up correctly, and to suit you.
Pole length
The first thing to do is adjust the poles to a length that suits you for hiking and trekking on relatively flat ground. This will be your default pole length that you will come back to each time you use them, or after you have adjusted the length for uphills and downhills (see below).
- Hold the poles out in front of you so that they are vertical, and check out the angle of your elbows.
- Set the length of the poles so that your elbows are angled somewhere between 90º and 135º.
Tip #1
Play with this angle until you find a spot that works best for you. I prefer hiking on the flat with with my poles set so that my elbows are just over a 90º. But others find that they get more forward propulsion if the angle is greater. Try different pole lengths out.
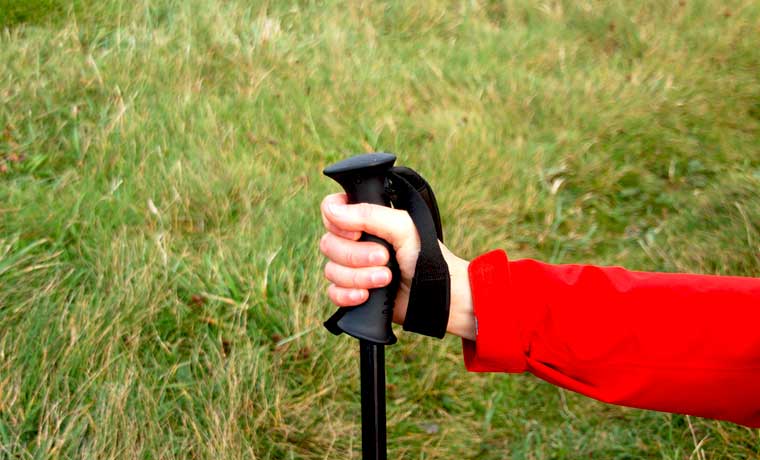
Straps
There is a right and wrong way to use your pole straps, so make sure your set them up correctly to get the best out of them, and to ensure that they are used safely.
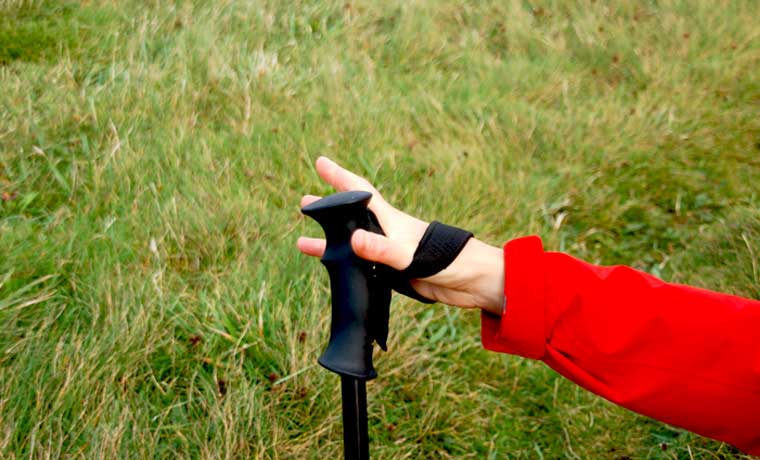
- Put your hand through the strap from below (come up from underneath instead of down from above).
- Hold onto the handle at the top of the grip.
- Shorten or lengthen the straps so that when you lean into them straps and let go of the grip, your hand remains in the same place and doesn’t slip down the grip.
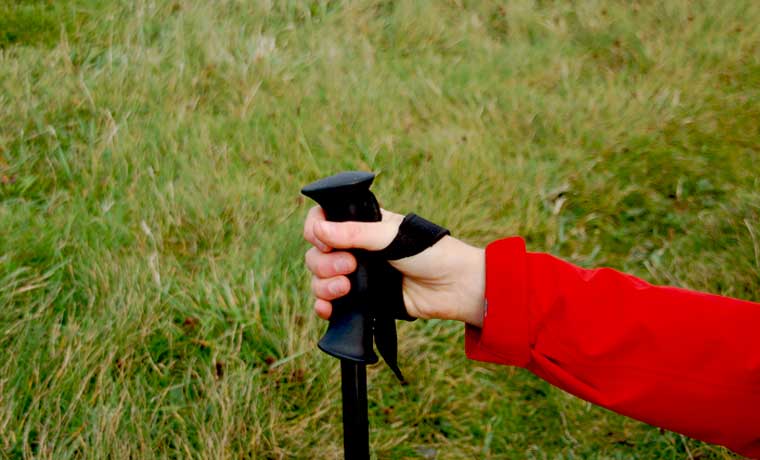
Tip #2
You shouldn’t have to grip your poles tightly for them to provide stability. So loosen your grip and put your weight into the straps.
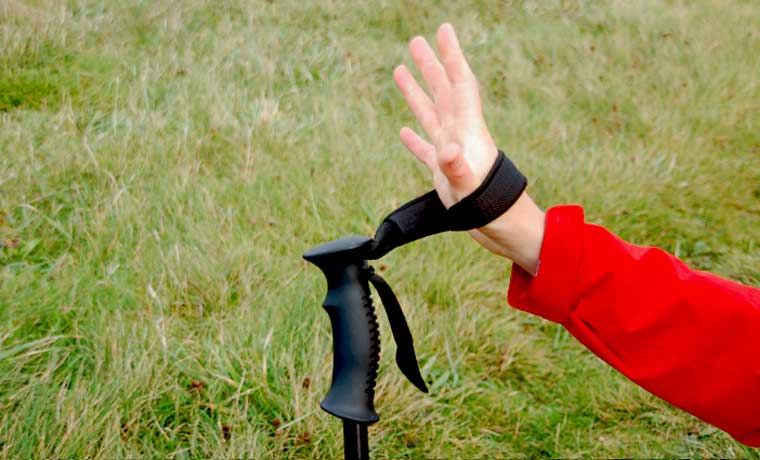
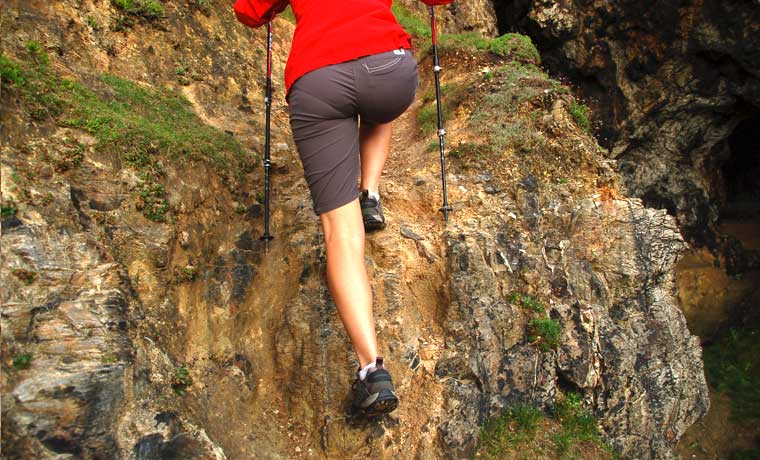
Incorrect use of your pole strap
Using the straps of your trekking poles incorrectly is really easy to do, and putting the straps on from above (as in the images below), is a common mistake.

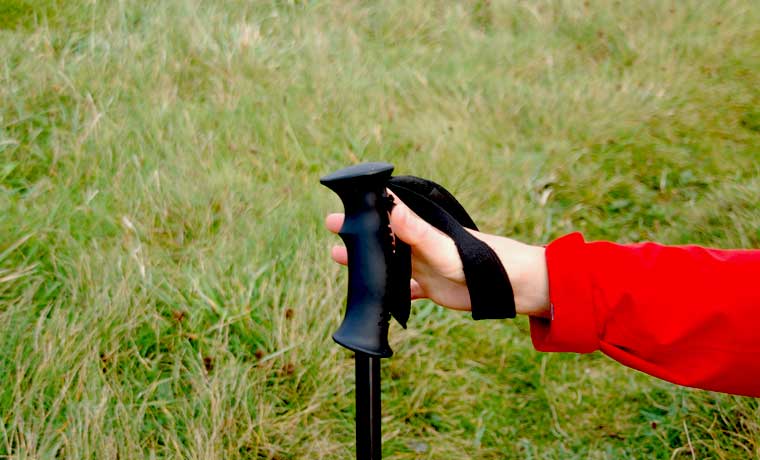
Here’s why the above strap position shouldn’t be used:
- If you fall and put your hands out to stop you, your pole handle will remain in the palm of your hands. This can result in you failing to get your hands down in time and falling on your face. Or you will end up putting your hands down with the poles trapped between your hands and the ground, potentially injuring your hands and/or fingers in the process.
- It is very difficult to put your weight through the pole straps in this position and you will end up gripping much harder that you need and relying on your grip rather than the strength of your wrists to support your weight.
- It is really difficult to switch from holding the grip in a regular position to holding the top of the grip when descending. You’ll end up getting the strap all twisted around your wrist and it becoming almost totally useless.
Tip #3
Always take your time to put on the pole straps correctly for convenience and safety.
Pole tip covers
One other thing to remember when setting up your trekking poles for a hike is to take the tip covers off! If you start hiking with them on (an easy mistake to make!), they can become super tough to take off.
How to use trekking poles
Now that your poles are all set up and ready to go, what on earth do you do with these stick insect-like extensions of your arms?
A very good question! Here’s a couple of methods to try out:
Asymmetrical use (alternate legs)
This is the most effective method of using poles to propel you forwards and to spread the weight of your body and backpack in a subtle way. You don’t have expend loads of energy to gain the benefits of using your poles in this way. And although you may not feel like you’re making much of a difference to lightening your load, over many miles on the trail and thousands of steps, the transferred weight will soon add up and your body will soon thank you for using your poles.
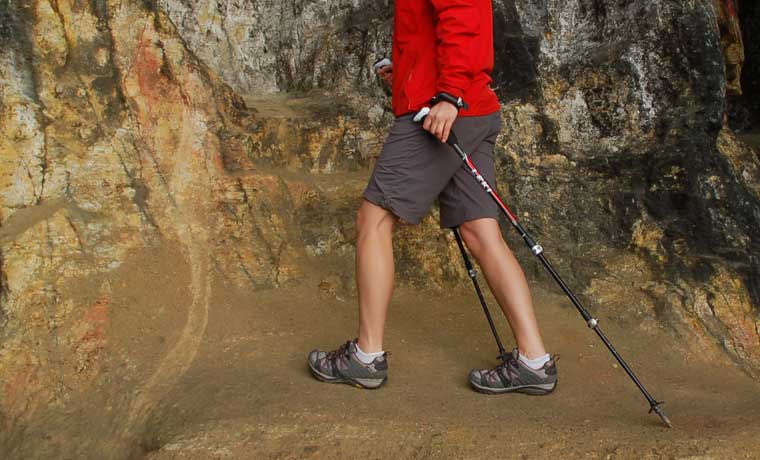
- Place your left pole down as you step forward with your right foot, and then place your right pole down as you step forward with your left foot. Just like how your arms swing when you walk. Without poles.
- Aim to place each pole onto the ground next to your back foot (i.e. place your left pole down next to your left foot as you step forward with your right foot).
- Don’t be tempted to place the pole down in front of you as all the energy will be driven downwards (to propel you upwards) instead of backwards (to propel you forwards).
Tip #4
Don’t try too hard to place extra weight into your poles. Even if you don’t really feel it, your poles will be doing much more than you realise to take on their share of the load.
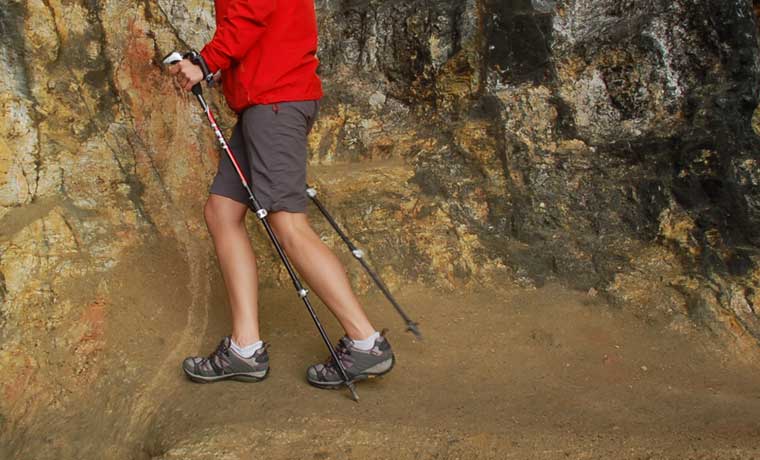
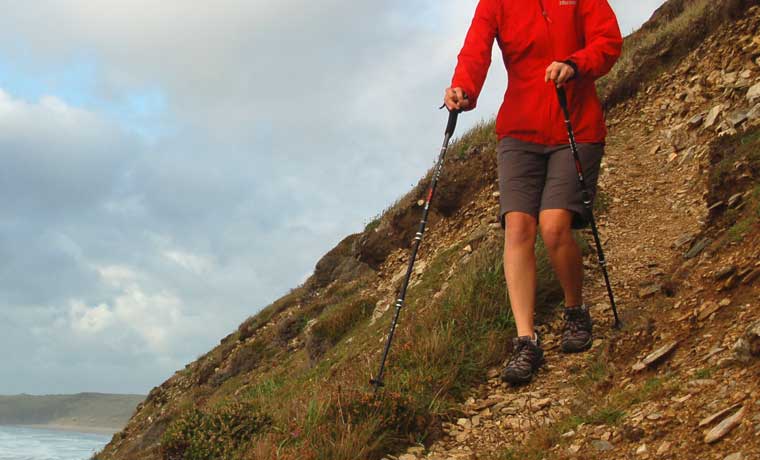
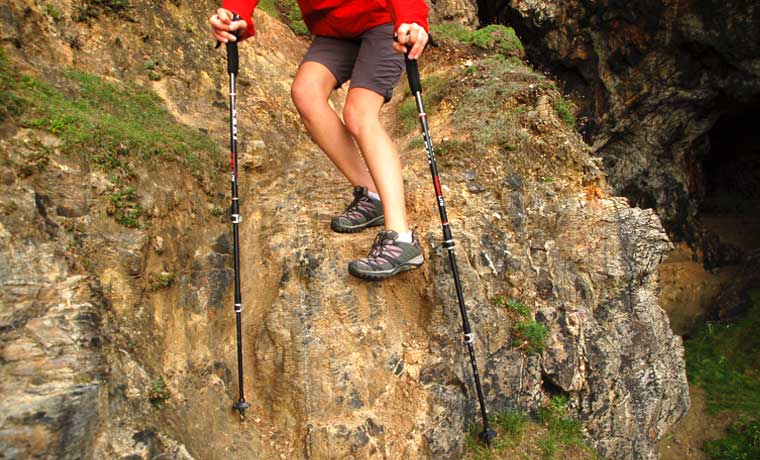
Double pole
This method can be used in all sorts of scenarios from ‘pole-vaulting’ over a muddy puddle to helping propelling you upwards when stepping up onto steep terrain and rocks. It is also good for leaning all your weight into on steep descents, or when on unbalance terrain (like river crossings) where you need as many points of contact with something solid as possible.

Place both poles on the floor at the same time in the following positions:
In front of you for upwards and downwards movement
- Near your front foot for forwards movement
- Wherever feels stable when on uneven ground
Tip #5
When putting lots of weight into both poles at the same time be sure that they are placed on stable, supportive ground.
Freestyle
There are times when hiking when you might find you’re just in the mood to casually stroll for a while to take it all in. At such times, some hikers will fold up their poles and store them in their packs. But I find that too much of a faff, especially when I may want to use them again soon. So I like to use my poles in no particular pattern at all. Just let them do what they naturally feel like doing at the time. This usually and inadvertently ends up becoming a pattern: I put down a pole every 2 or 3 steps, instead of every step. This is also a useful mode to switch to when you are on really narrow trails where putting a pole down each step just isn’t possible.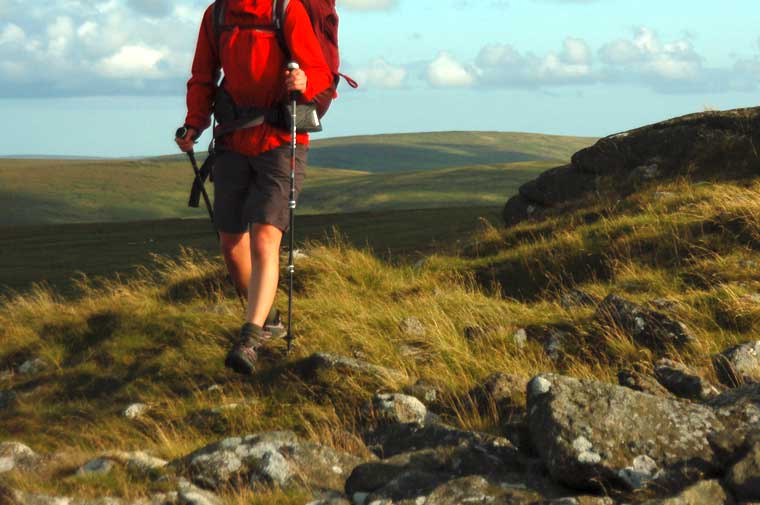
But I like that I don’t have to stick to any strict way of using my poles and that it doesn’t matter if they’re not being particularly useful for a little while. So long as I always come back to the default alternate leg pattern.
Tip #6
Once you’ve happy with the alternate leg pattern, try out other patterns. And try not trying at all! Just switch your brain off and see what you end up doing naturally.
How to use trekking poles hiking uphill
When using your poles asymmetrically whilst hiking uphill you will end up placing the poles more in front of you than when hiking on the flat. So before you start your ascent it’s a good idea to shorten your poles slightly to maintain your preferred elbow angle. If you don’t shorten them you will end up reaching up to place your poles and fatiguing your shoulders in an effort to pull yourself up to the level of your poles.
If the terrain becomes very steep then you may find it difficult to maintain an alternate leg pattern. Double poling is really useful in this instance, as well as freestyling! Place your pole where you feel you need it the most, or indeed where there is a place available to put it.
Tip #7
If the terrain gets into scrambling territory, where you need to use your hands as much as you legs, you may want to stow your poles away altogether.
How to use trekking poles hiking downhill
As with hiking uphill, it’s really helpful to lengthen your poles slightly for downhill sections. Again, this maintains your preferred elbow angle and will stop you from bending down to lean your weight into the poles.
Altering your grip position will also provide you with much more stability on steep descents. Instead of holding the grip in the regular position, place the top of the pole in the palm of your hand and wrap your thumb and fingers around and underneath it. Lean your weight into the top of the pole through the palm of your hand, rather than through the wrist straps in the regular position.
Adopting the double pole method is also good on steep downhills, as well as freestyling, and it also helps if you place your poles a little wider than normal to increase your stability as you descend.
Again, if you end up needing your hands to down climb large boulders, steps and sections of rock, ditching your poles into your pack is a good idea before they become more of a hindrance than a help.
Tip #8
Keep experimenting with different ways to use your trekking poles and try out a few different pole lengths too before you settle for what anyone else might tell you – they’re just guidelines. And so long as your poles are taking some weight, providing support, propelling your forwards in a positive way and are being useful to you, then you’re doing something right!
Now that you know how to use trekking poles, and you’ve read about all the amazing benefits of using them, all that’s left is for you to get yourself a great pair of poles and get using them!

Happy poling, happy hikers!
