Pizza. Isn’t it the best? I’ve yet to meet anyone that doesn’t love it. It combines all the best components of fast food: doughy carbs, melted cheesiness and full-flavoured toppings that make you keep crawling back for just another slice!
But what about when you’re camping and you just fancy something naughty and yummy at the end of a long day out in the wild? It’s not like you can just order a take out. Fear not, fellow pizza fiends. First up, cooking campfire pizza IS possible. And better still, it’s also amazingly (and surprisingly) delicious. Plus, you can make it from scratch for a healthy alternative to shop-bought pizza, and you can top it with whatever yumminess tickles your fancy. See, camping food really doesn’t need to be pasta, pasta and more pasta!
There are a few different ways to make campfire pizza. The method you choose largely depends on the cooking equipment you have. I’ll go over the options. But the recipe at the bottom of the article uses a method which is super easy. Plus, most campers should have the equipment already at their disposal without having to invest in fancy cast iron pans or Dutch ovens.
- How to make campfire pizza: 7 ways
- How to make campfire pizza video
- Campfire pizza recipe
- Campfire pizza making tips

How to make campfire pizza: 7 ways
Making campfire pizza is much easier than you may think. And it also doesn’t take as long as you might think. You can even prepare your campfire pizza dough at home before you go camping and keep it in a cooler until you need to use it. Alternatively, the dough is easy to make at camp. Skip down to the campfire pizza dough recipe at the bottom to learn how.
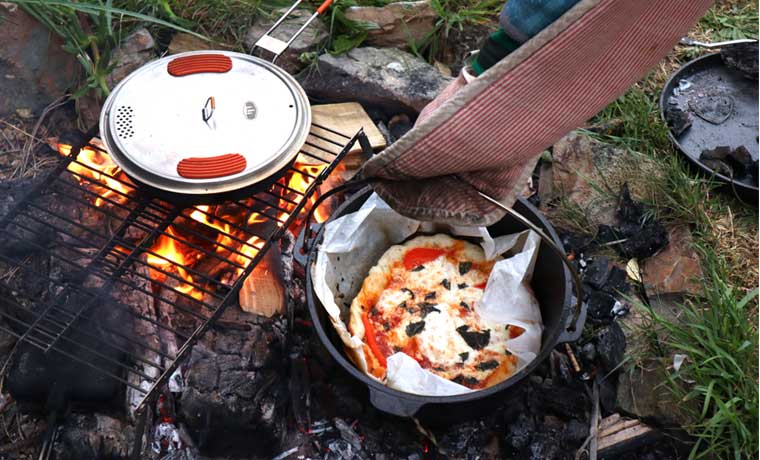
01Dutch oven pizza
Cook time: 15-20 minutes
Equipment needed: Dutch oven and lid, parchment paper, sticks or skewers, lid lifter or heat resistant gloves
Prepare the pizza on parchment / greaseproof paper. This makes it easy to lift the pizza in and out of the Dutch oven. The high sides of the oven make it tricky to get a spatula underneath it.
Where possible, use ingredients that aren’t excessively moist as these ingredients can make the dough go soggy. To help with this, place some sticks or skewers across the top of the oven and place the lid on top of them. This creates an outlet for the moist steam that is created as the pizza is cooking.
Cooking Dutch oven pizza doesn’t require a grill to place the oven on. You can cook directly on the fire or alternatively you can use coals and place them underneath and on top of the oven.
02In a deep camping pot
Cook time: 10-15 minutes
Equipment needed: Camp pot and lid, parchment paper, a grill
Cooking your campfire pizza in a regular camp cooking pot will give you similar results to cooking it in a Dutch oven. The main difference is that the bottom is more likely to burn. As with Dutch oven pizza, use greaseproof paper to aid pizza removal. But also consider using an extra layer at the bottom to help prevent burning. Cover with a lid that ideally has drainage holes to let out the moisture.
03Campfire pizza in foil
Cook time: 10-15 minutes
Equipment needed: Thick foil, cocktail sticks, a grill
If you are short of cooking equipment, or want to make multiple pizzas at the same time, cook your campfire pizza in foil.
Place the prepared pizza on a large sheet of thick foil and then wrap the excess over the top of the pizza. To prevent the top of the foil from sticking to the top of the pizza you can place cocktail sticks into the top of the pizza. The foil will then sit on top of these instead of the cheese. To allow steam to escape, prick a couple of holes in the top of the foil.

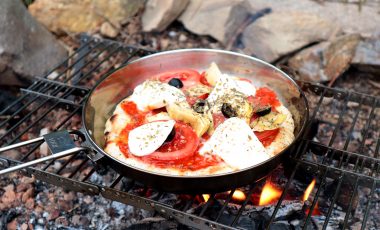
04Campfire pizza in frying pan
Cook time: 5-10 minutes
Equipment needed: Frying pan with a lid, spatula, a grill
The recipe at the bottom of the article uses this method. It’s really simple and quick, too, making it a good option if you want to cook multiple small pizzas. Serve up one, and by the time you’ve eaten it, the second one will be almost done.
Oil the bottom on the frying pan and cook the dough for 2-3 minutes. Take it off the heat, flip it over in the pan, add your toppings and place the pan back on the fire. Cover the pan with a lid that has holes in it.
05Grilled pizza
Cook time: 5-10 minutes
Equipment needed: Spatula, brush for oiling, a grill
Cooking grilled pizza requires a grill with narrow gaps otherwise there’s a risk that the dough will slip through into the fire! It also requires a mature campfire that has no flames but hot embers / charcoal. If you have both of these then give it a go!
Oil the grill first with a brush and cook one side of the dough first (like the frying pan method). Once the underside is browned, oil the top, flip it over with a spatula, add your toppings and leave to cook for another few minutes. Depending on what toppings you want to add, it may be best to cook them on the grill prior to adding them to the pizza.
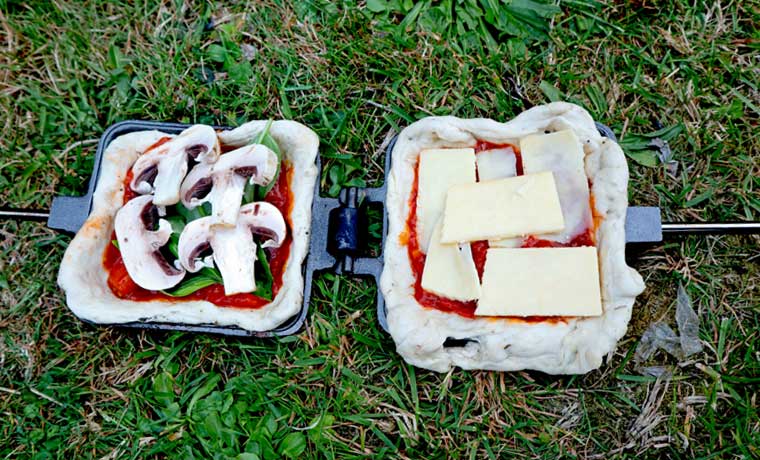
06Campfire pizza pockets
Cook time: 3-5 minutes
Equipment needed: Pie iron
Cooking campfire pizza pockets is an excellent option if you don’t have a grill. It’s also a fun way to get the kids involved. However, you do need a pie iron or two.
Oil the pie iron and place a square of dough on the bottom plate. Top with your favourite sauce and toppings, place another square of dough over the toppings and close the lid. Then simply hold the pie iron in or over the fire, turning regularly until the crust is browned and crispy and the cheese melted.
07Campfire pizza on a stick
Cook time: 5-10 minutes
Equipment needed: A stick or skewer
Campfire pizza on a stick isn’t technically pizza, but all the same ingredients are there – just arranged differently! This method is another good option if you don’t have any cooking equipment or are cooking over a fire without a grill. Plus, everyone can cook their own at the same time.
Thread your toppings (cheese chunks and all!) onto a skewer or stick, like a kebab. Wrap a length of pizza dough around the kebab, pinching in the ends so that the cheese doesn’t drip out. Hold over the fire, rotating until golden brown. To serve, dip into a bowl of heated pizza sauce. Yum!
How to make campfire pizza video
Campfire pizza recipe
This simple recipe can be made from scratch at camp or you can make the dough at home before you head for the hills. The method for cooking the pizza over a campfire also works over a regular camping stove.
Makes 4 x 8” pizzas
Ingredients
- 400g of all purpose flour or strong white bread flour + a little extra for kneading
- 1 tsp salt
- 1 tsp sugar
- 1 tsp oregano
- 1 sachet of fast action yeast
- 300ml warm water
- A drizzle of olive oil
- 2 tbs pizza sauce per pizza
- Toppings of your choice
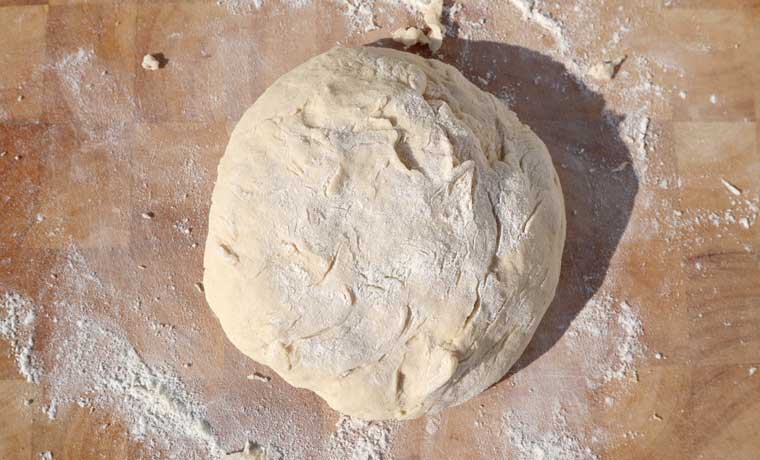
Make the dough
- Mix together the flour, yeast, salt and oregano in a bowl.
- Add the warm water and stir until all the ingredients bind together. You may need to add more flour if it is very sticky or water if it isn’t binding together well.
- Knead the dough on a well floured surface for around 5 minutes until it has formed a ball.
- Lightly oil the bowl and place the dough ball back into it.
- Cover with a cloth or lid and leave for 20-30 minutes to rise.

Cook the pizza base
- Divide the dough into four.
- Lightly oil the bottom of your pan – this is important to prevent the base from sticking to the pan.
- Spread one of the balls out on your surface then transfer into the pan, further spreading the dough to fit the base of the pan.
- Lightly prick the surface of the dough and place the pan over a hot fire.
- After a couple of minutes, check the base of your pizza. If it is golden brown then take it off the heat, otherwise leave it on a little longer. This depends on how hot your fire is and the sort of pan you are using.
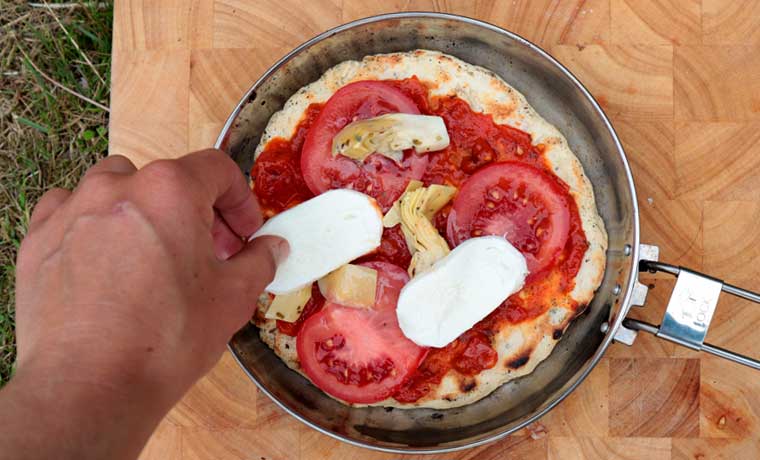
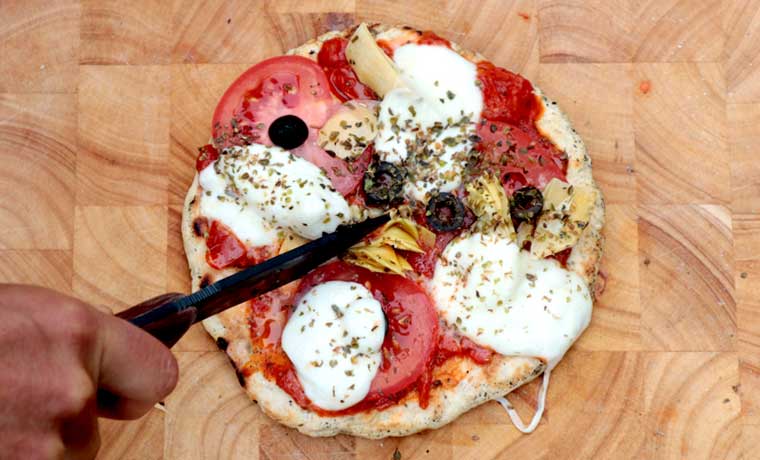
Create and cook the pizza
- Once one side of the base is browned, turn it over and spread the cooked side with your pizza sauce.
- Add the rest of your toppings and place back over the campfire.
- Put a lid over the pan and leave to cook for another couple of minutes until the base has browned and the toppings have cooked and/or melted.
Campfire pizza making tips
Avoid moisture build up
To prevent your campfire pizza from turning into a mushy, soggy, doughy mess, it’s important to avoid moisture from building up inside your pot or Dutch oven. This is less of an issue when adopting methods where you cook one side of the pizza first and then flip it. The pre-cooked top of the pizza will resist the moisture, to a degree. However, when using a Dutch oven or deep camp pot there are a couple of ways to minimise moisture build up:
- Don’t top your pizza with moisture heavy ingredients like courgettes, and squeeze out as much water as possible from your mozzarella. Use sauce sparingly, too. You can always dip into it later!
- Create a gap between your Dutch oven or pot and its lid. This let’s out the steam.
- Use a lid with drainage holes in it to let our the steam.
Pre-cook ingredients
Some toppings take a while to cook, especially vegetables. So, in the same way that you would pre-cook chicken before you added it to your pizza, you may want to pre-cook some other topping options.
Fresh aubergines, courgettes and peppers will all benefit from being grilled or sauteed over the fire before you add them to your pizza.
Create a mature fire
A well cooked campfire pizza will benefit from a mature fire. Get your wood or coals going well before you start preparing your meal. Feed the fire until some good sized logs have taken. Then let the flames die down until there is a good base of intense heat to cook on.
Cook the dough as soon as it’s spread
Leaving your pizza dough to rest after you have prepared it is good to let it rise. This will result in a soft and flavoursome crust. However, once it has risen and you have spread out the dough in the pan, try to cook it straight away so that it doesn’t continue to rise and become too airy.
Pre-make the dough at home
If the idea of making the dough at camp isn’t for you, then make it a home before you go camping. Once you have created the dough, place it in a tupperware that has enough room for the dough to rise, and refrigerate. Store it in a cooler at camp for up to two days.
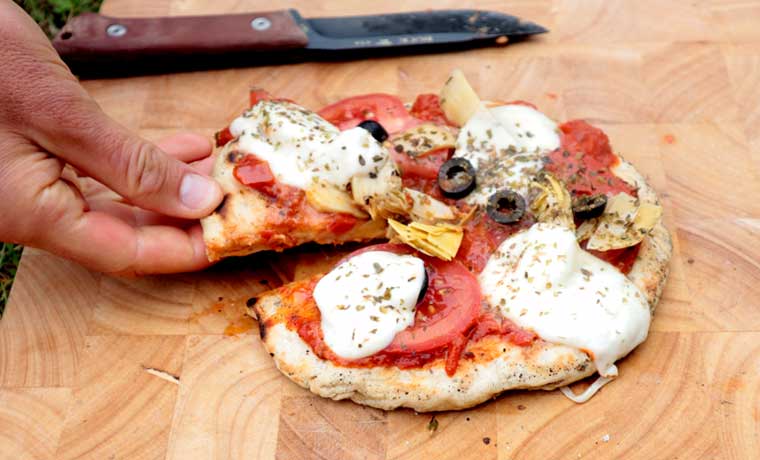
Experiment with different toppings
There are LOADS of amazing toppings you can add to your pizza that you may not ordinarily consider. So while you’re experimenting with your new-found campfire pizza cooking, why not get adventurous with your toppings too?
Take a look at these pizza topping ideas to get your creative juices flowing.
